はじめに
前回Ethereumを使ったICOについて概要を説明しました。
今回はトークンを実際に実装してみてテストネットにデプロイするところまでをやってみます。
動作環境
- macOS High Sierra Version 10.13
- Mist Version: 0.9.3
- Geth Version: 1.7.2
開発環境準備
Ethereum用ブラウザMistをインストール
オンラインのRemix IDEで開発も出来ますが、今回は公式から提供されているDappsブラウザであるMistを使って開発します。
まず最新のMistをダウンロードしてインストールしておきます。
https://github.com/ethereum/mist/releases
Mist-macosx-0-9-3.dmg
初期起動時はデータの同期にしばらく時間がかかります。
アカウントの作成
[ADD ACCOUNT]でスマートコントラクト実行用のアカウント(アドレス)を作成します。

新しくアカウントを作成する場合は[Create new account]で進みます。

トランザクションの作成時に使用するパスワードを設定します。(2回聞かれます)

アカウントのkeyfilesをバックアップするように言われますが、テスト用アカウントなので特に気にせず進みます。

[STAY ANONYMOUS]でアカウントの作成が完了します。

デフォルトのアカウント名だと分かりづらいため、今回使用するアカウント名をそれぞれ「TEST 1」と「TEST 2」としました。

マイニング実行
送金やコントラクトを実行するためにマイニングを実行しておきます。
Mistからローカル環境でGethを起動することができます。
[Develop]>[Network]>[Solo network]でネットワークを選択します。

マイニングを実行します。

あれ、マイニングどうやって止めるんだ?と思いましたが、どうやら今のバージョンではコンソールでコマンドを叩いて止めるしかなさそうです。
[Develop]>[Toggle developer tools]>[Mist UI]から開発者ツールを表示させます。


以下のコマンドを実行してマイニングを停止します。
> web3.miner.stop()
コントラクトの実行にはetherが必要なので、MAIN ACCOUNTからTEST 1アカウントに少額を送金しておきます。

ERC-20トークン開発
ERC-20トークンとは?
Ethereum上でトークンを開発する場合の実装ルールです。
独自のトークンが乱立するのを防ぎ、統一的に扱えるように開発コミュニティ内で取り決めが行われました。
現在では公式で推奨されています。
サンプルコードが公式で詳しく解説されています。
Create your own CRYPTO-CURRENCY with Ethereum
ERC-20トークンの概要については前回の記事を参照してください。
ERC-20トークン実装
基本的に公式のサンプルコードを使用します。
https://ethereum.org/token#the-code
コントラクト名のみ変更します。
pragma solidity ^0.4.16;

interface tokenRecipient { function receiveApproval(address _from, uint256 _value, address _token, bytes _extraData) public; }

contract KuboCoin {
    // Public variables of the token
    string public name;
    string public symbol;
    uint8 public decimals = 18;
    // 18 decimals is the strongly suggested default, avoid changing it
    uint256 public totalSupply;

    // This creates an array with all balances
    mapping (address => uint256) public balanceOf;
    mapping (address => mapping (address => uint256)) public allowance;

    // This generates a public event on the blockchain that will notify clients
    event Transfer(address indexed from, address indexed to, uint256 value);

    // This notifies clients about the amount burnt
    event Burn(address indexed from, uint256 value);

    /**
     * Constrctor function
     *
     * Initializes contract with initial supply tokens to the creator of the contract
     */
    function KuboCoin(
        uint256 initialSupply,
        string tokenName,
        string tokenSymbol
    ) public {
        totalSupply = initialSupply * 10 ** uint256(decimals);  // Update total supply with the decimal amount
        balanceOf[msg.sender] = totalSupply;                // Give the creator all initial tokens
        name = tokenName;                                   // Set the name for display purposes
        symbol = tokenSymbol;                               // Set the symbol for display purposes
    }

    /**
     * Internal transfer, only can be called by this contract
     */
    function _transfer(address _from, address _to, uint _value) internal {
        // Prevent transfer to 0x0 address. Use burn() instead
        require(_to != 0x0);
        // Check if the sender has enough
        require(balanceOf[_from] >= _value);
        // Check for overflows
        require(balanceOf[_to] + _value > balanceOf[_to]);
        // Save this for an assertion in the future
        uint previousBalances = balanceOf[_from] + balanceOf[_to];
        // Subtract from the sender
        balanceOf[_from] -= _value;
        // Add the same to the recipient
        balanceOf[_to] += _value;
        Transfer(_from, _to, _value);
        // Asserts are used to use static analysis to find bugs in your code. They should never fail
        assert(balanceOf[_from] + balanceOf[_to] == previousBalances);
    }

    /**
     * Transfer tokens
     *
     * Send `_value` tokens to `_to` from your account
     *
     * @param _to The address of the recipient
     * @param _value the amount to send
     */
    function transfer(address _to, uint256 _value) public {
        _transfer(msg.sender, _to, _value);
    }

    /**
     * Transfer tokens from other address
     *
     * Send `_value` tokens to `_to` in behalf of `_from`
     *
     * @param _from The address of the sender
     * @param _to The address of the recipient
     * @param _value the amount to send
     */
    function transferFrom(address _from, address _to, uint256 _value) public returns (bool success) {
        require(_value <= allowance[_from][msg.sender]);     // Check allowance
        allowance[_from][msg.sender] -= _value;
        _transfer(_from, _to, _value);
        return true;
    }

    /**
     * Set allowance for other address
     *
     * Allows `_spender` to spend no more than `_value` tokens in your behalf
     *
     * @param _spender The address authorized to spend
     * @param _value the max amount they can spend
     */
    function approve(address _spender, uint256 _value) public
        returns (bool success) {
        allowance[msg.sender][_spender] = _value;
        return true;
    }

    /**
     * Set allowance for other address and notify
     *
     * Allows `_spender` to spend no more than `_value` tokens in your behalf, and then ping the contract about it
     *
     * @param _spender The address authorized to spend
     * @param _value the max amount they can spend
     * @param _extraData some extra information to send to the approved contract
     */
    function approveAndCall(address _spender, uint256 _value, bytes _extraData)
        public
        returns (bool success) {
        tokenRecipient spender = tokenRecipient(_spender);
        if (approve(_spender, _value)) {
            spender.receiveApproval(msg.sender, _value, this, _extraData);
            return true;
        }
    }

    /**
     * Destroy tokens
     *
     * Remove `_value` tokens from the system irreversibly
     *
     * @param _value the amount of money to burn
     */
    function burn(uint256 _value) public returns (bool success) {
        require(balanceOf[msg.sender] >= _value);   // Check if the sender has enough
        balanceOf[msg.sender] -= _value;            // Subtract from the sender
        totalSupply -= _value;                      // Updates totalSupply
        Burn(msg.sender, _value);
        return true;
    }

    /**
     * Destroy tokens from other account
     *
     * Remove `_value` tokens from the system irreversibly on behalf of `_from`.
     *
     * @param _from the address of the sender
     * @param _value the amount of money to burn
     */
    function burnFrom(address _from, uint256 _value) public returns (bool success) {
        require(balanceOf[_from] >= _value);                // Check if the targeted balance is enough
        require(_value <= allowance[_from][msg.sender]);    // Check allowance
        balanceOf[_from] -= _value;                         // Subtract from the targeted balance
        allowance[_from][msg.sender] -= _value;             // Subtract from the sender's allowance
        totalSupply -= _value;                              // Update totalSupply
        Burn(_from, _value);
        return true;
    }
}
トークンコントラクトをコンパイルする
[CONTRACTS]タブを開き、[DEPLOY NEW CONTRACT]からコントラクトデプロイに進みます。

実行アカウントをTEST 1に指定して、[SOLIDITY CONTRACT CODE]にコードを貼り付けます。

コンパイルは自動で実行されるので、エラーや警告が出ていなければデプロイ可能です。
デプロイするコントラクトを選択します。

コンストラクタに渡すパラメータを入力します。
Initial supply: 10000
Token name: KuboCoin
Token symbol: KBT
パラメータの入力が完了したら[DEPLOY]を実行します。

コントラクトデプロイのトランザクションの準備ができました。アカウントを作成した時のパスワードを入力し、[SEND TRANSACTION]を実行します。

トランザクションがEthereum上で検証されています。

トランザクションが確定しました。

トークンコントラクトがローカル環境で作成されました。

トークン実行
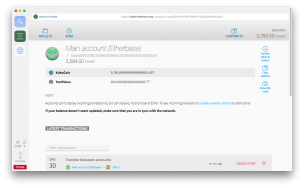
[WRITE TO CONTRACT]からTransfer関数を選択します。

トークンをTEST 2宛に100KBT送金する場合は、toにTEST 2のアドレスを、valueは100e18として実行します。

TEST 1アカウントからTEST 2アカウントに向けて100KBT送金することができました。


以上でEthereum上で動作するトークンの実装が完了しました。
今回はテンプレートをそのまま使いましたが、サービスによって独自の処理を追加することもできます。
この辺の仕様はまだまだ試行錯誤されている段階なので、今後もどんどんアップデートされていくと思います。
トークンコントラクトをテストネット(Rinkeby)にデプロイ
せっかくなのでテストネットにデプロイしてみます。
テストネットはいくつか存在しますが、ここではRinkebyを使います。
以下のリンクから開発用のetherがもらえます。
Twitter、Facebook、Google Plusのどれかで受け取り用のアドレスとポストして、そのURLを送るともらえる仕組みになっています。
https://www.rinkeby.io/#faucet
Mistで同様の手順でデプロイします。
その際ネットワークを切り替えるのを忘れないでください。

Etherscanでデプロイされたコントラクトを確認することができます。
rinkeby.etherscan.io: KuboCoin

まとめ
Ethereumを使えば簡単に独自トークンを作成することができます。
ただし、Ethereumを使ったトークンなので手数料としてetherを支払う必要があります。どういった使い方にすべきかは検討が必要です。
今回はテンプレートをそのまま使いましたが、実際にICOを実施する場合は購入のロジックなどが必要になってきます。
とはいえ、アイデア次第で色々面白いことが出来そうです!
技術としてまだまだこれからなのが面白いですね。2018年も追っていきたいと思います。
それでは!